Enabling payments via a payment link
- General information
- Step 1. Obtain the required IDs
- Step 2. Enable the Client ID
- Step 3. Initialize FirebaseApp in all the app's workflows
- Step 4. Enable the Yandex Pay SDK
- Step 5. Get an object of the payment session
- Step 6. (optional) Place the Yandex Pay button on the screen
- Step 7. Initialize a contract for Yandex Pay launch
- Step 8. Generate data for launching Yandex Pay
- Step 9. Launch Yandex Pay
- Step 10. Handle the results
- Setup for devices with Android version lower than 7.0
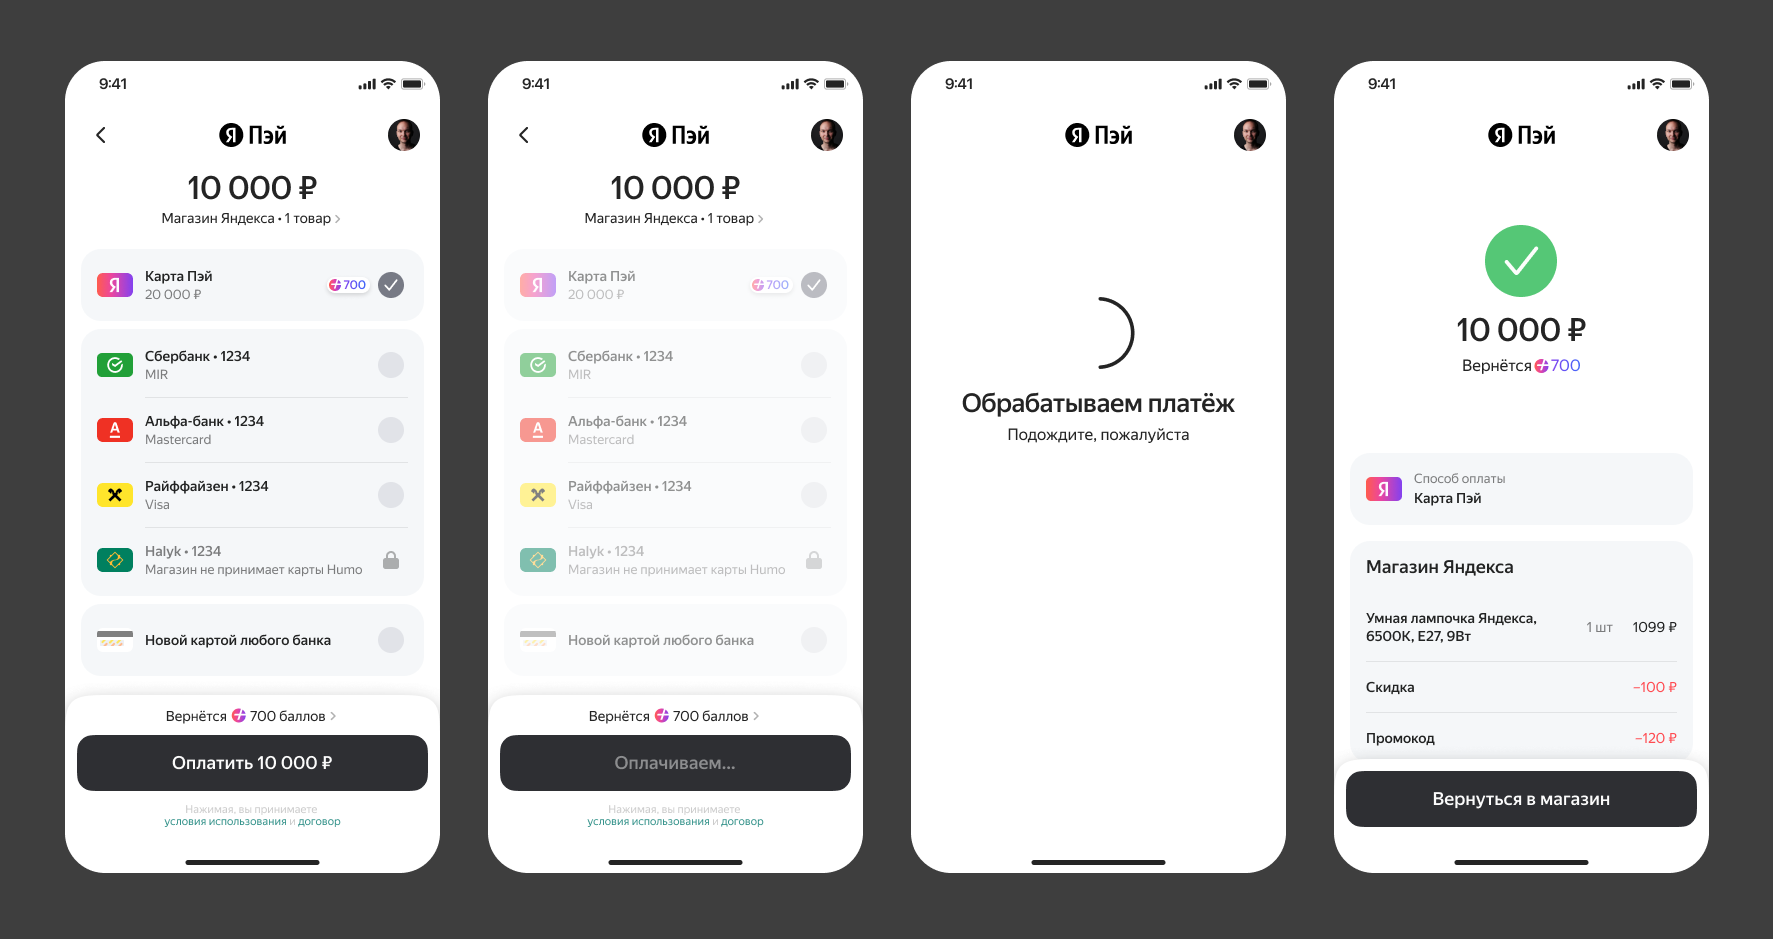
General information
Note
Starting with version 2.3.0-alpha01, the SDK uses a new workflow. For details, see this article.
How it works
-
The user taps the pay button in the app.
-
The user goes to the Yandex Pay payment form screen, with the following information displayed:
- A list of the user’s bank cards.
- Payment options via the Faster Payment System (SBP).
-
The user selects a payment method and clicks on the order confirmation button.
-
Yandex Pay service completes a payment and returns the operation result.
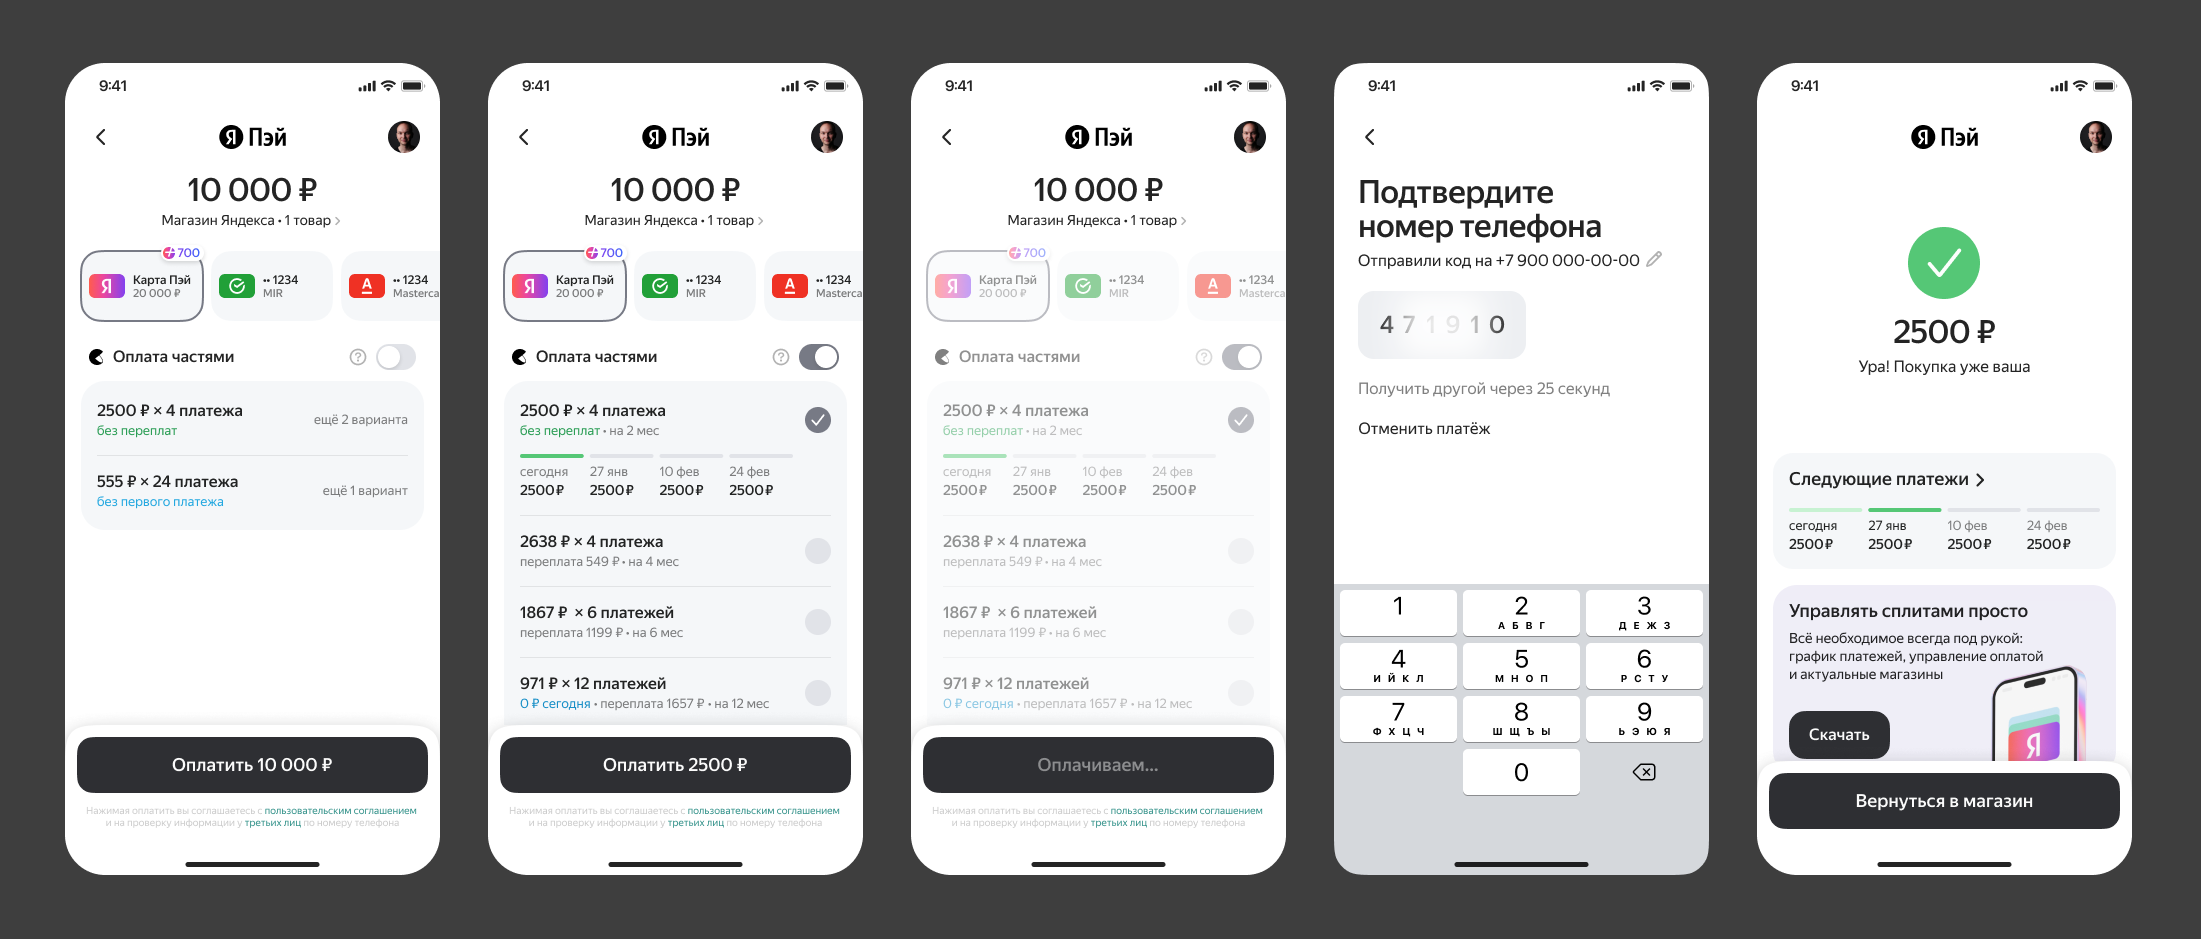
Full payment
Split payment
Requirements for connecting
Supported version: Android 7.0 and higher.
Note
If your project's minSdkVersion is 23 or lower, see info about support for lower device versions.
Before you start the integration, obtain the following IDs and add them to your project:
- Merchant ID
- SHA256 Fingerprints
- Client ID (
YANDEX_CLIENT_ID) - Android package name (
applicationId)
Step 1. Obtain the required IDs
-
Get the SHA256 Fingerprints hash value using the
keytoolutility:keytool -list -v -alias <your-key-name> -keystore <path-to-production-keystore>Once you enter the command, the hash value will be shown under
Certificate fingerprints: SHA256. -
To register the app, go to Yandex OAuth and click Create app.
-
In the Service name field, enter the name to be displayed to users on the authorization screen, and upload the application icon.
-
Under Platforms, select Android app and set its parameters:
- Android package name: Unique app name from the project config file's
applicationId. - SHA256 Fingerprints: SHA256 hash value from step 1. The hash must contain capital letters only.
- Android package name: Unique app name from the project config file's
-
Make sure that your app has access to Yandex Pay added in Yandex OAuth. To do this, select Payment via Yandex Pay in the Permission name field of the Data access section.
-
Click Create app and copy the Client ID field value.
-
On the Settings page of the Yandex Pay dashboard, specify the Client ID, SHA256, and Android package name values in the Client ID, SHA256 Fingerprints, and Android package name fields, respectively.
Step 2. Enable the Client ID
Specify the resulting Client ID in the build.gradle build script as the YANDEX_CLIENT_ID value in manifestPlaceholders:
   android {
     defaultConfig {
       manifestPlaceholders = [
         // Use your Client ID
         YANDEX_CLIENT_ID: "12345678901234567890",
       ]
     }
   }
Step 3. Initialize FirebaseApp in all the app's workflows
The Mobile SDK uses AppMetrica services to ensure the stable operation of the SDK. This step helps fix the Firebase and AppMetrica service compatibility issues.
If Firebase is used along with the Yandex Pay SDK, call FirebaseApp.initialize(context) in all the app's workflows.
If you use AppMetrica in your app, be sure to activate YandexMetrica after Firebase is initialized.
Example
// Don`t forget declare MyApplication in AndroidManifest.xml in <application/> block using android:name
class MyApplication: Application() {

    override fun onCreate() {
        // Inited at every app processes
        FirebaseApp.initializeApp(this)
    }
}
Step 4. Enable the Yandex Pay SDK
Add the following dependency to your build.gradle build scripts:
dependencies {
    implementation 'com.yandex.pay:pay:2.6.0'
}
Step 5. Get an object of the payment session
Get an object of the payment session using the getYandexPaymentSession function:
  private val yaPayConfig = YPayConfig(
    merchantData = MerchantData(
        id = MerchantId("merchantId"),
        name = MerchantName("merchantName"),
        url = MerchantUrl("https://merchant.com/"),
    ),
    environment = YPayApiEnvironment.PROD,
  )

  private val paymentSessionKey = PaymentSessionKey(
    generateSessionKey()
  )

  private val paymentSession: PaymentSession = YPay.getYandexPaymentSession(
    context = this,
    config = yaPayConfig,
    sessionKey = paymentSessionKey  // Optional if you're using Kotlin for implementation
  )
  private YPayConfig getPayConfig() {
    return new YPayConfig(
        new MerchantData(
            new MerchantId("merchantId"),
            new MerchantName("MERCHANT_NAME"),
            new MerchantUrl("https://merchant.com/")
        ),
        YPayApiEnvironment.PROD
    );
  }

  private PaymentSessionKey getPaymentSessionKey() {
    return new PaymentSessionKey(
        generateSessionKey()
    );
  }

  private PaymentSession getPaymentSession() {
    return YPay.INSTANCE.getYandexPaymentSession(
        this,
        getPaymentSessionKey(),
        getPayConfig()
    );
  }
When getting a PaymentSession, be sure to pass:
Context: The context of the application or Activity.PaymentSessionKey: Key of the payment session.YPayConfig: Data about the Yandex Pay SDK configuration.
When creating YPayConfig, be sure to pass:
-
merchantData: Data of the merchant:id: Unique merchant ID. You can get it when registering a merchant in Yandex Pay service.name: The name of the merchant that the user will see.url: The URL of the merchant that the user will see.
-
environment: The Yandex Pay SDK execution environment:PROD: Production environment.SANDBOX: A test environment.
Step 6. (optional) Place the Yandex Pay button on the screen
Add the button to your layout:
<androidx.constraintlayout.widget.ConstraintLayout
    xmlns:android="http://schemas.android.com/apk/res/android"
    xmlns:app="http://schemas.android.com/apk/res-auto"
    xmlns:tools="http://schemas.android.com/tools">

    <com.yandex.pay.YPayButton
        android:id="@+id/y_pay_button"
        android:layout_width="300dp"
        android:layout_height="54dp"
        android:layout_marginTop="4dp"
        app:ypay_color_scheme="by_theme"
        app:ypay_corner_radius="4dp" />
When creating a button, you can pass values for the attributes:
-
ypay_color_scheme: With this option, you can define the color palette of the button. Acceptable values:by_theme: The color palette is adapted to match the system theme.light: The color palette is always light.dark: The color palette is always dark.
-
ypay_corner_radius: With this option, you can define the corner radius for the button (indp).
When initializing the view components, bind the current session's object to the button using a PaymentSession object and its bindTo function:
In addition, pass SessionListenerArgs with a list of payment methods allowed for the user.
fun initViews() {
    paymentSession.bindTo(yPayButton, SessionListenerArgs(listOf(PaymentMethodType.CARD,PaymentMethodType.SPLIT)))
}
void initViews() {
    getPaymentSession().bindTo(yPayButton);
}
Step 7. Initialize a contract for Yandex Pay launch
When initializing the contract, add a callback that obtains the YPayResult:
private val yandexPayLauncher = YPayLauncher(this) { result: YPayResult ->
    when (result) {
        is YPayResult.Success -> showToast("Finished with success")
        is YPayResult.Cancelled -> showToast("Finished with cancelled event")
        is YPayResult.Failure -> showToast("Finished with domain error")
    }
}
private final YPayLauncher launcher = new YPayLauncher(this, yPayResult -> {
    if (yPayResult instanceof YPayResult.Success) {
        handleResult("Finished with success");
    } else if (yPayResult instanceof YPayResult.Cancelled) {
        handleResult("Finished with cancelled event");
    } else if (yPayResult instanceof YPayResult.Failure) {
        handleResult("Finished with domain error");
    }
});
In the event of payment failure, the errorMsg error code is also returned:
| Error code | Description |
|---|---|
incorrect payment url |
Invalid payment link |
transaction error |
Error performing transaction |
failed to parse order ID |
No orderId received with the results returned |
invalid intent parsing |
No payment results received |
invalid result code |
Invalid payment result code |
unresolved payment strategy |
Couldn't handle the payment results because your app shut down in the background |
session key not provided |
No session key provided |
config data not provided |
The СonfigData object not provided |
payment data not provided |
The PaymentData object not provided |
Step 8. Generate data for launching Yandex Pay
Before launching Yandex Pay, generate payment data using the PaymentData.PaymentUrlFlowData class and payment session data. Create YPayContractParams based on this data.
val paymentData = PaymentData.PaymentUrlFlowData(
    // Order payment URL received from the Yandex Pay API
    paymentUrl = "payment-url"
)

val params = YPayContractParams(
    paymentSession = paymentSession,
    paymentData = paymentData,
)
final PaymentData paymentData = new PaymentData.PaymentUrlFlowData(
    // Order payment URL received from the Yandex Pay API
    "payment-url"
);

// Parameters for launching Yandex Pay
final YPayContractParams params = new YPayContractParams(
    getPaymentSession(),
    paymentData
);
Note
If you want to enable Split payments, pass the required parameters to availablePaymentMethods when generating a link.
For more information about generating a payment link, see the backend documentation.
Step 9. Launch Yandex Pay
Launch via the Yandex Pay button
Pass the previously created launcher to the button using the setOnClickListener function and define its launch logic in a lambda expression. When running the launcher, pass the YPayContractParams parameters to it:
yPayButton.setOnClickListener(yandexPayLauncher) { launcher ->
    val params = YPayContractParams(...)
    launcher.launch(params)
}
yPayButton.setOnClickListener(yandexPayLauncher, launcher -> {
    YPayContractParams params = new YPayContractParams(...);
    launcher.launch(params);
});
Warning
The YPayButton has its own setOnClickListener function created. The entire logic for click handling should be specified in it. Calling the View.setOnClickListener will throw an exception.
Launch without using the button
Run the service using the launcher, passing the YPayContractParams launch parameters:
val params = YPayContractParams(...)
yandexPayLauncher.launch(params)
final YPayContractParams params = new YPayContractParams(...);
yandexPayLauncher.launch(params);
Step 10. Handle the results
After Yandex Pay is launched, the SDK will select the optimal strategy and run the payment form to complete the payment in. The result will be obtained using the launch contract YPayLauncher.
Note
If you encounter any problems with the setup, see the integration example.
Setup for devices with Android version lower than 7.0
Owners of devices with Android 7.0 (API level 24) or higher can use the Yandex Pay SDK without any restrictions. There may be restrictions for devices with Android version lower than 7.0:
- No official support.
- Limited SDK functionality.
- Additional environment setup is required as described below.
-
Enable the SDK dependency in your project's
build.gradlefile:dependencies{ ... implementation "com.yandex.pay:*pay/other*:*version*" ... } -
Sync the project and try to build it. This should result in the manifest merger error:
Manifest merger failed : uses-sdk:minSdkVersion *Your min version* cannot be smaller than version 24 declared in library -
Open the AndroidManifest.xml file of the module where you're adding the dependency and list all the libraries this error refers to.
Example:
<manifest xmlns:tools="http://schemas.android.com/tools"> <uses-sdk tools:overrideLibrary="com.yandex.pay, ...* other libraries *... ,com.yandex.pay.base"/> </manifest> -
Check if the SDK is supported via the YPay object and initialize all the necessary components after the check:
if (YPay.isSupported){
    // init Yandex pay
} else {
    // do some other logic
}
Warning
Run the
YPay.isSupportedavailability check each time the Yandex Pay SDK is accessed.