Unity-plugin integration
- Step 1. Get the necessary IDs
- Step 2. Connect the Yandex Pay InApps plugin
- Step 3. Specify the Client ID
- Step 4. Add Android Activity to the manifest
- Step 5. Resolve Android dependencies using the External Dependency Manager
- Step 6. Place the payment button on the stage
- Step 7. Add merchant data
- Step 8. Generate the payment details
- Step 9. Process the payment result
- Step 10. Customize the payment button
Integration requirements
Android version: Android 7.0 (API Level 24) or higher.
Unity version: Unity 2022.3 or higher.
Before starting the integration, obtain several IDs and add them to the project:
- Merchant ID
- SHA256 Fingerprints
- Client ID (
YANDEX_CLIENT_ID) - Android package name (
applicationId)
Step 1. Get the necessary IDs
-
Get the hash value of SHA256 Fingerprints using the
keytoolutility:keytool -list -v -alias <your-key-name> -keystore <path-to-production-keystore>After entering the command, the hash value will be displayed in the block
Certificate fingerprints: SHA256. -
To register the app, go to Yandex OAuth and click Create app.
-
In the Service name field, enter the name to be displayed to users on the authorization screen, and upload the application icon.
-
Under Platforms, select Android app and set its parameters:
- Android package name: Unique app name from the project config file's
applicationId. - SHA256 Fingerprints: SHA256 hash value from step 1. The hash must contain capital letters only.
- Android package name: Unique app name from the project config file's
-
Make sure that your app has access to Yandex Pay added in Yandex OAuth. To do this, select Payment via Yandex Pay in the Permission name field of the Data access section.
-
Click Create app and copy the Client ID field value.
-
On the Settings page of the Yandex Pay dashboard, specify the Client ID, SHA256, and Android package name values in the Client ID, SHA256 Fingerprints, and Android package name fields, respectively.
Step 2. Connect the Yandex Pay InApps plugin
-
Connect the External Dependency Manager according to the documentation.
-
Add the Yandex Pay InApps plugin depending on the Packages/manifest.json:
{
  "dependencies": {
    "com.yandex.pay.inapps": "https://github.com/yandex-pay-mobile/inapps-unity-plugin.git#v1.3.0"
  }
}
Step 3. Specify the Client ID
Specify the received Client ID in the Assets/Plugins/Android/launcherTemplate.gradle assembly script in manifestPlaceholders as the YANDEX_CLIENT_ID value:
android {
    defaultConfig {
        // Add your Client ID
        manifestPlaceholders["YANDEX_CLIENT_ID"] = "12345678901234567890"
    }
}
If there is no such file
- In the Unity editor window, select the menu item: Edit → Project Settings → Player and open the Android tab.
- Open the Publishing Settings section.
- In the Build section, enable the Custom Launcher Gradle Template option.
Note
The next step will also require a custom AndroidManifest.xml. To create it, enable the Custom Main Manifest option in the Build section.
Step 4. Add Android Activity to the manifest
Add YPayActivity with the specified theme to the manifest Assets/Plugins/Android/AndroidManifest.xml:
<manifest
    xmlns:android="http://schemas.android.com/apk/res/android">
    <application>
        ...
        <activity android:name="com.yandex.pay.inapps.YPayActivity"
            android:theme="@android:style/Theme.Translucent.NoTitleBar.Fullscreen" />
    </application>
</manifest>
If there is no such file
- In the Unity editor window, select the menu item: Edit → Project Settings → Player and open the Android tab.
- Open the Publishing Settings section.
- In the Build section, enable the Custom Main Manifest option.
Step 5. Resolve Android dependencies using the External Dependency Manager
In the Unity Editor window, select the menu item: Assets → External Dependency Manager → Android → Force Resolve.
Step 6. Place the payment button on the stage
- In the Project Unity Editor tab, open the Packages folder.
- Find Yandex Pay InApps in the list of connected packages.
- Find the button template in the
Yandex Pay InApps/Runtime/Prefabs/YPay Buttondirectory and drag it onto the stage.
Warning
The payment button, like all UI elements, must be located inside the Canvas object. Canvas also requires an additional EventSystem object to work. For more information, see Unity documentation.
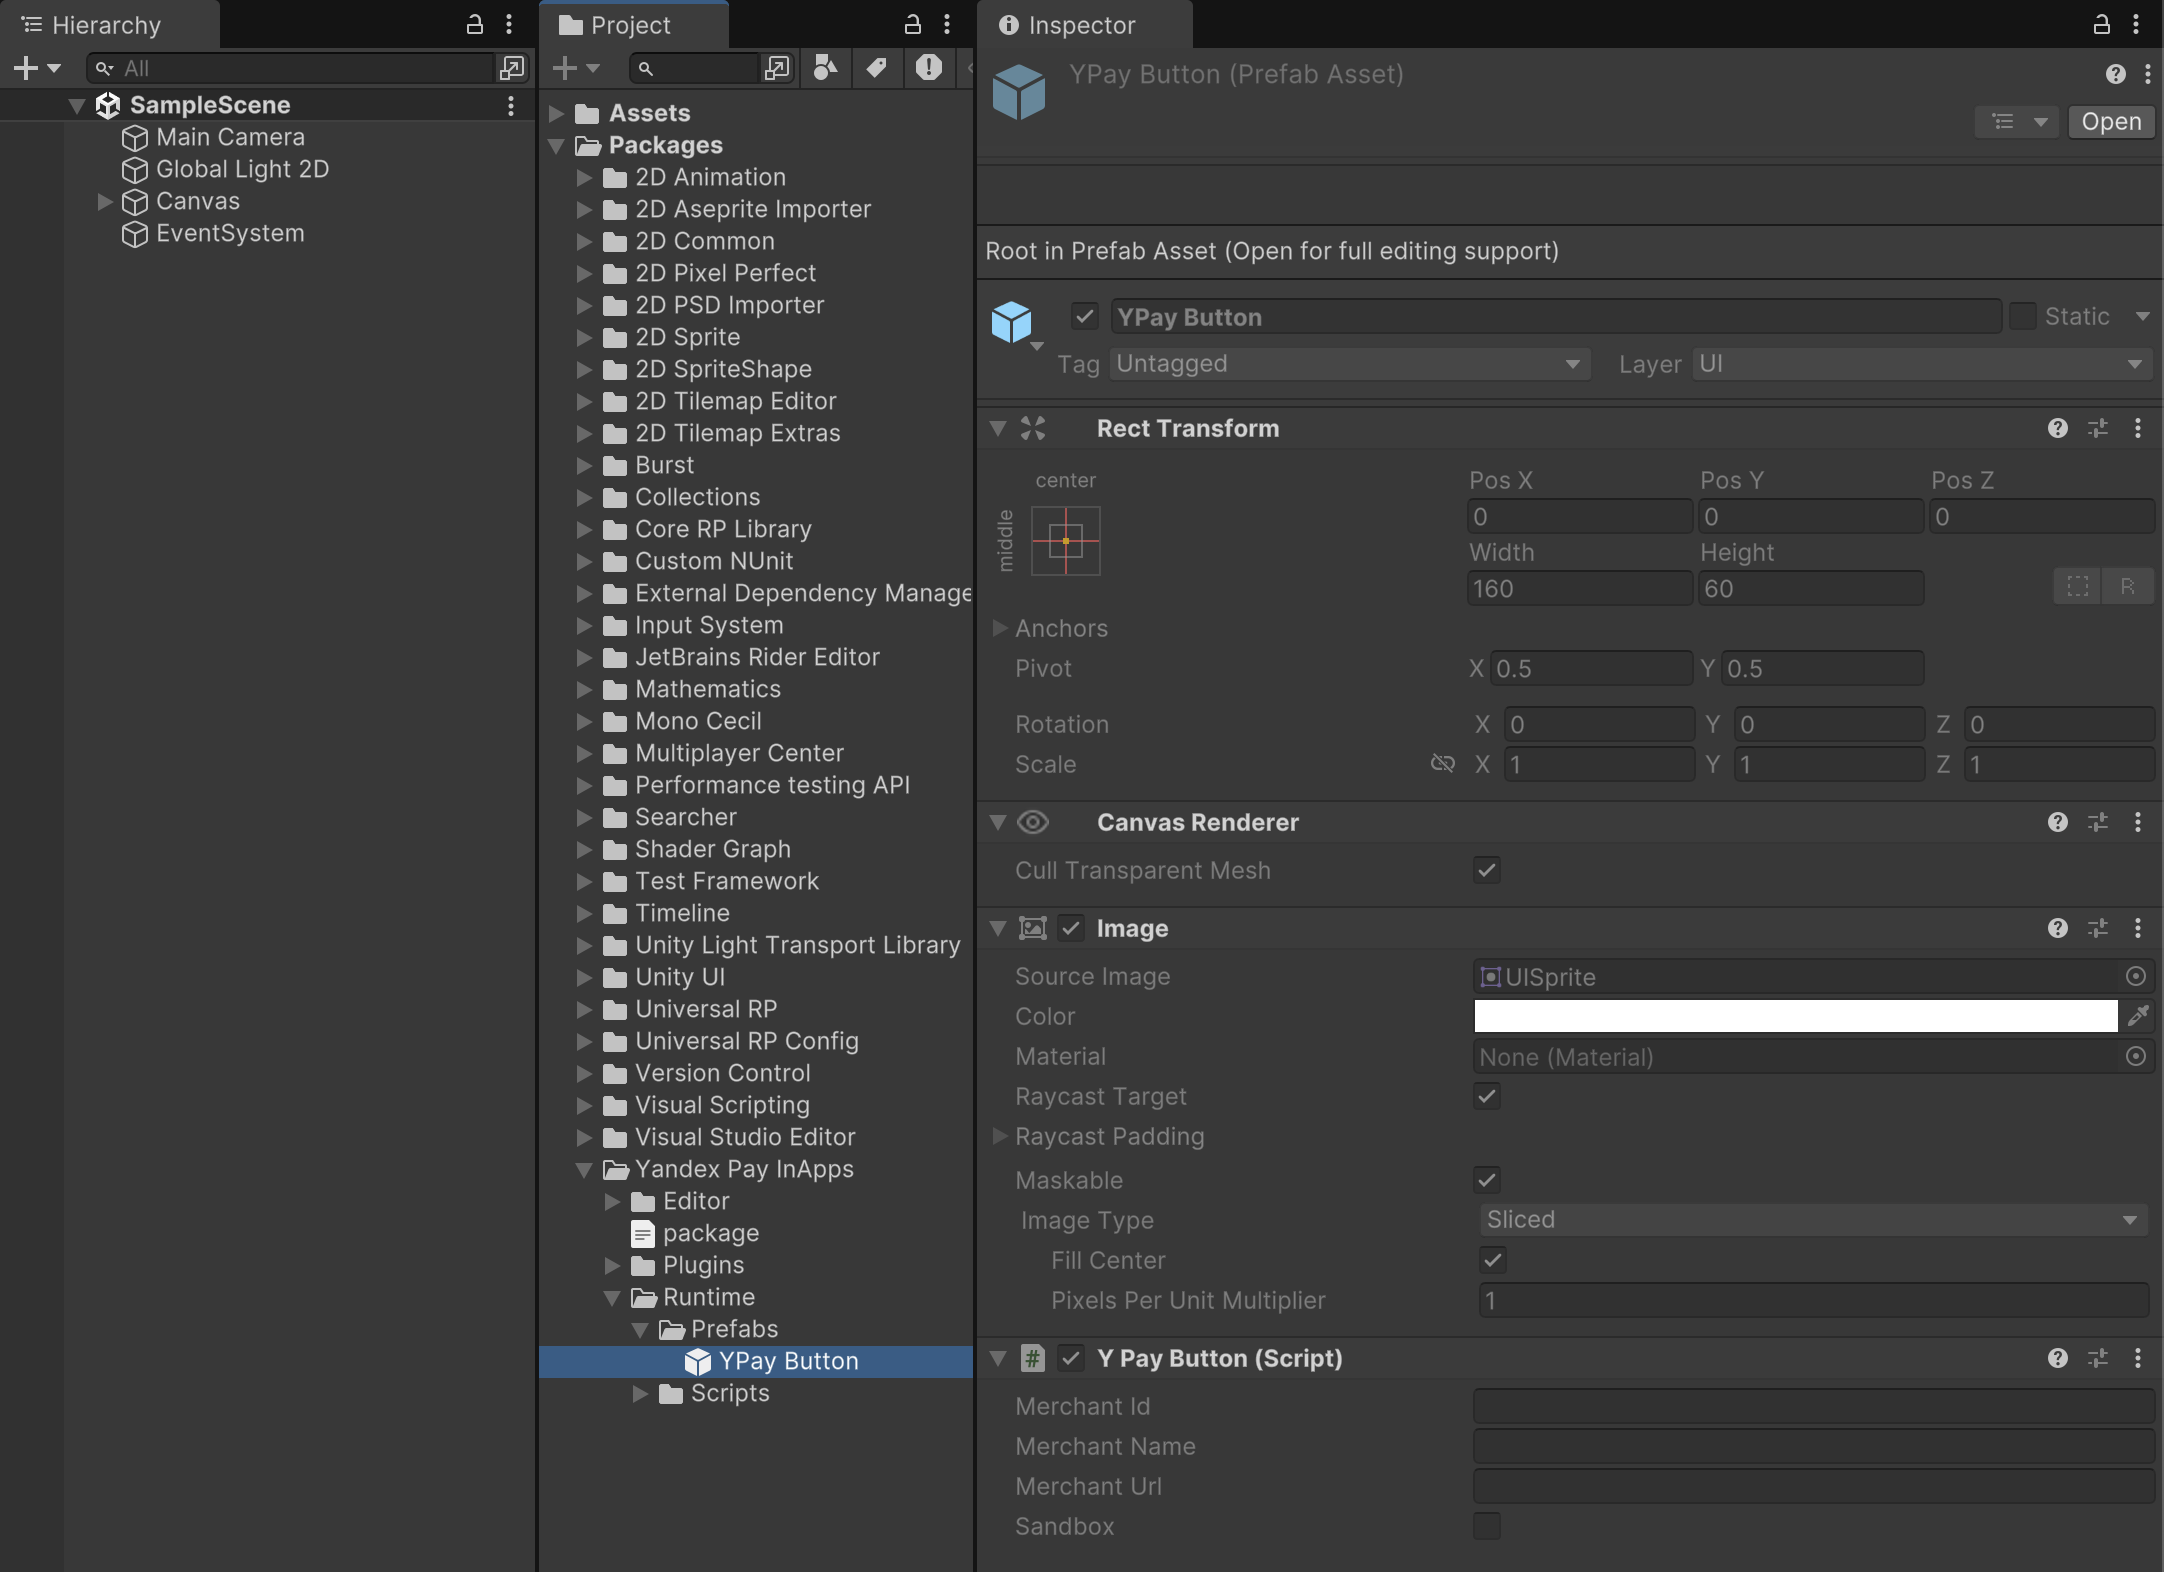
Step 7. Add merchant data
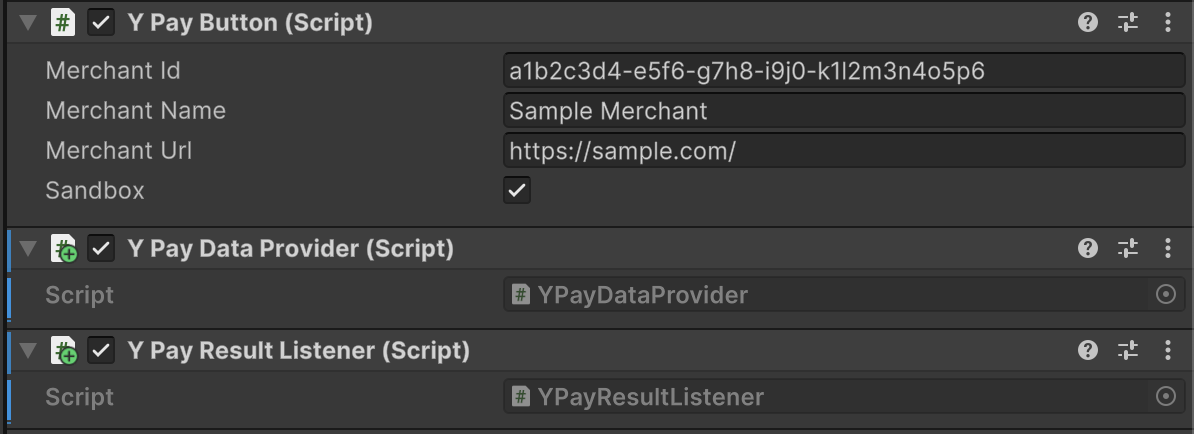
In the Unity inspector, select the Y Pay Button object. Fill in the following information in the button editor:
Merchant Id— the unique identifier of the merchant. It can be obtained when the merchant registers in the Yandex Pay service;Merchant Name— the name of the merchant that will be displayed to the user;Merchant Url— the URL of the merchant that will be displayed to the user.
Enable the Sandbox option to use the test environment.
Step 8. Generate the payment details
Develop a class that implements the IYPayDataProvider interface. This class should generate a payment session key and receive a payment link from the Yandex Pay service.
Implementation example
using System.Threading.Tasks;
using UnityEngine;
using YPay;

public class YPayDataProvider : MonoBehaviour, IYPayDataProvider
{
    public string GetPaymentSessionKey()
    {
        // Generating a payment session key
        var sessionKeyGenerator = new SomeSessionKeyGenerator();
        var sessionKey = sessionKeyGenerator.GenerateSessionKey();

        return sessionKey;
    }

    public async Task<string> GetPaymentUrlAsync()
    {
        // Getting a payment link from the Pay API
        var networkManager = new SomeNetworkManager();
        var paymentUrl = await networkManager.GetPaymentUrlAsync();

        return paymentUrl;
    }
}
Add the created script as a component to the payment button.
Note
For more information about generating a payment link, see the backend documentation.
Step 9. Process the payment result
Develop a class that implements the IYPayResultListener interface.
Implementation example
using UnityEngine;
using YPay;

public class YPayResultListener : MonoBehaviour, IYPayResultListener
{
    public void OnPaymentResult(IYPayResult result)
    {
        // Processing the payment result
        switch (result)
        {
            case IYPayResult.Success success:
                HandleSuccess(success.OrderId);
                break;
            case IYPayResult.Failure failure:
                HandleError(failure.ErrorMessage);
                break;
            case IYPayResult.Cancelled cancelled:
                HandleCancellation();
                break;
        }
    }
}
Error codes
In the event of payment failure, the errorMsg error code is also returned:
| Error codes | Description |
|---|---|
incorrect payment url |
Wrong payment link |
transaction error |
Transaction processing error |
failed to parse order ID |
Couldn't get the orderId when returning the result |
invalid intent parsing |
Couldn't receive payment result |
invalid result code |
Invalid payment result code |
unresolved payment strategy |
Couldn't handle the payment results because your app shut down in the background |
session key not provided |
The session key was not provided |
config data not provided |
The СonfigData object was not provided |
payment data not provided |
The PaymentData object was not provided |
Add the created script as a component to the payment button.
Step 10. Customize the payment button
Customize the appearance of the payment button using the Unity editor to meet your design requirements.